RE/MAX Real Estate Centre Inc.
2022 Printer installation Site
Mac Instructions
- Click the link at the bottom of this page for the printer you want to install.
- Open the Downloaded file.
- Run the .pkg by double-clicking on it.
- Follow the wizard to install the driver.
- If you are installing multiple printers, the above steps only need to be completed once for each printer model.
- Go to System Preferences and click on Printers & Scanners.
- Click the + to add a new printer.
- Click the IP icon.
- Fill in the boxes as follows:
- Protocol: HP Jet Direct - Socket
- Address: The IP address at the bottom of this page for the printer you want to install.
- Queue: Leave this blank.
- Name: Enter a descriptive name for the printer, e.g. Cambridge Main Floor.
- Location: Leave this blank.
- Print Using: This should be the printer model. If it is not, click the Drop-down and select 'Select Printer Software'. Select the printer model and click OK.
- Click Add.
- Open the Apple Notes App.
- Go to File, Print.
- If you see a small box with few options, click the 'Show Details' button.
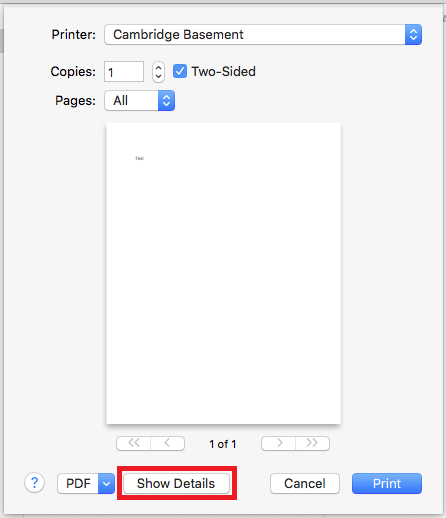
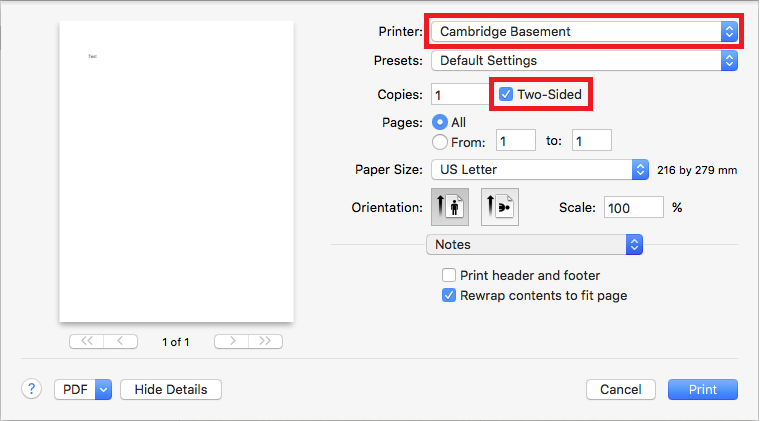
- Select the printer you just installed from the Printer dropdown.
- Click to uncheck the Two-Sided box.
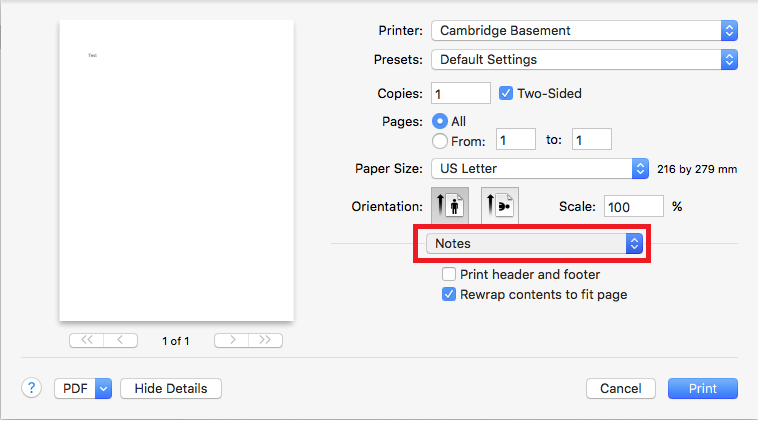
- Click the Notes dropdown.
- Select User Authentication, click to check the User Authentication box, and enter your username in the "Enter Login User Name" box.
NOTE: Your username is listed on the USERNAME page of this site.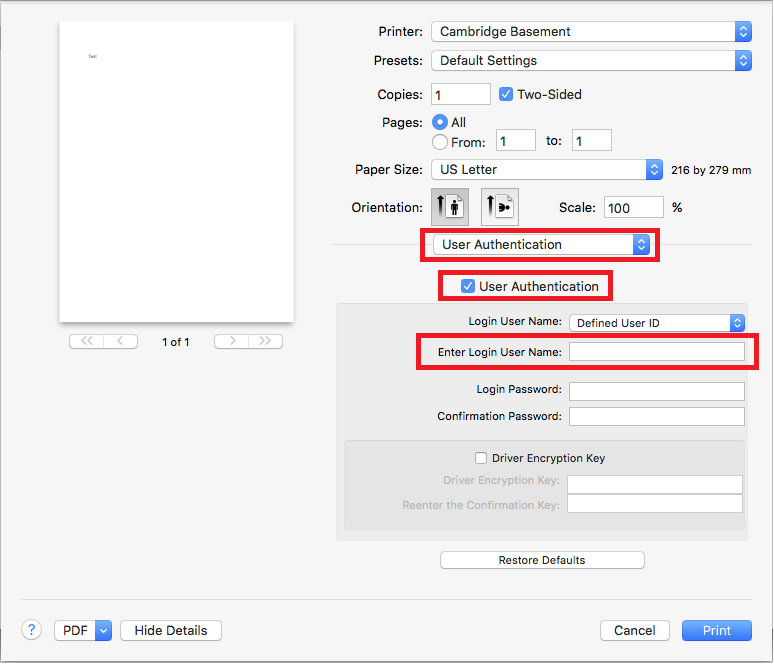
- Click the Presets dropdown and Save Current Settings as Preset.
- Name this preset 'Colour' and click OK.
- Click the User Authentication dropdown, select Printer Features. Change the Colour Mode to Black and White.
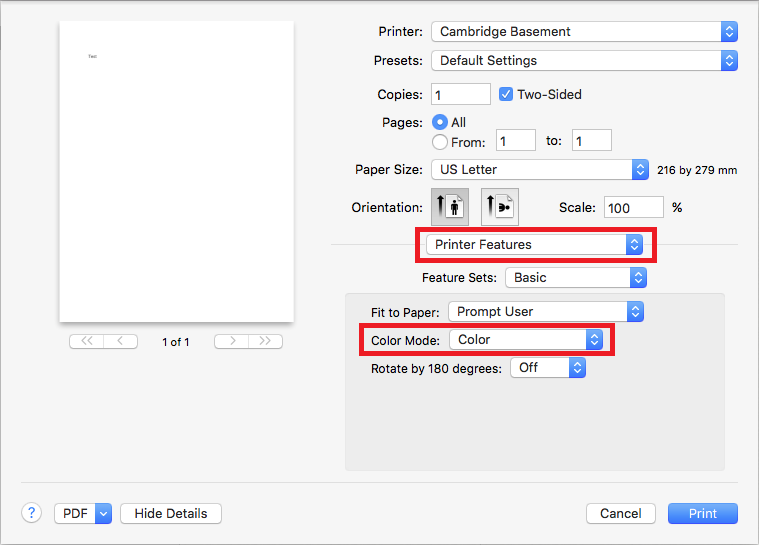
- Click the Presets dropdown and Save Current Settings as Preset.
- Name this preset 'Black & White' and click OK.
- To print, you must select the the printer and then make sure to select either the Colour or Black and White preset.
- Important Note: When you print something, the job does not print immediately. It is held in the queue on the printer. To print the job, login to the printer (using your 6-digit PIN or fob), then select Secure Print Manager. Your jobs will be listed under the Local HDD heading. Select the job(s) and press Print.
| Printer | Driver | IP Address |
|---|---|---|
| Brampton South - Main | RICOH IM C3500 | 10.10.10.30 |
| Burlington - Main Floor | RICOH IM C3500 | 172.16.8.30 |
| Burlington - Second Floor | RICOH IM C3500 | 172.16.8.31 |
| Burlington - Agent Area | RICOH IM C400 | 172.16.8.35 |
| Cambridge - Main Floor | RICOH IM C3500 | 10.10.1.36 |
| Cambridge - Second Floor | RICOH IM C3500 | 10.10.1.37 |
| Cambridge - Basement | RICOH IM C3500 | 10.10.1.30 |
| Erin - Main | RICOH IM C3500 | 10.10.8.30 |
| Erin - Agent Area | RICOH P 800 | 10.10.8.31 |
| Fergus - Main | RICOH IM C3500 | 10.10.6.36 |
| Georgetown - Main | RICOH IM C3500 | 10.10.7.31 |
| Georgetown - Krause Team | RICOH P 800 | 10.10.7.36 |
| Guelph Speedvale - Front | RICOH IM C3500 | 10.10.3.37 |
| Guelph Speedvale - Main | RICOH IM C3500 | 10.10.3.36 |
| Hamilton - Main | RICOH IM C3500 | 10.10.5.31 |
| Kitchener - Main Floor | RICOH IM C3500 | 10.10.11.30 |
| Kitchener - Second Floor | RICOH IM C3500 | 10.10.11.31 |
| Milton - Main | RICOH IM C3500 | 10.10.4.31 |
| Mississauga Burnhamthorpe - Main Floor | RICOH IM C3500 | 172.16.0.14 |
| Mississauga Burnhamthorpe - Second Floor | RICOH IM C3500 | 172.16.0.15 |
| Mississauga Burnhamthorpe - Agent Area | RICOH IM C3500 | 172.16.0.16 |
| Mississauga Derry - Front | RICOH IM C3500 | 192.168.2.226 |
| Mississauga Derry - Back | RICOH IM C3500 | 192.168.2.225 |
| Orangeville - Main Floor | RICOH IM C3500 | 10.10.9.31 |
| Orangeville - Second Floor | RICOH IM C3500 | 10.10.9.30 |
| Orangeville - Agent Area | RICOH IM C400 | 10.10.9.35 |
| Shelburne - Main | RICOH IM C400 | 10.10.12.30 |